Reading And Inverting An Image Using Python
Table of Contents
Introduction
An image can be considered as a matrix of numbers (usually integers) where its size is specified by its total number of rows and columns. The value in each pixel specify its intensity value. This specifies its color at the particular point/pixel.
In an 8-bit grayscale image, the color intensity values span from 0-255 where 0 is black and 255 is white. The numbers in between specify all the scales between these two extreme colors.
In this post, we are going to upload an image and compute its inverse. This can be calculated by subtracting the color intensity values from the maximum value, i.e., 255. So, by this operation, all the white colored pixels will black and vise versa. All the other intermediate values will also be changed accordingly. In the next section, the python implementation of the problem will be presented. In the final section, the code will be tested against a real image. N.B. The image used here is a black and white image.
Python Implementation
First let’s import the necessary python libraries
import numpy as np

import matplotlib.pyplot as plt
%matplotlib inline

import PIL.Image as Image
The function below computes the negative of a given image. It takes the original image (in the form of a matrix) as an input and returns its negative as its output.
def computeNegativeImage(imge):
    """
    Computes the negative pixel values of an image.

    Parameters
    ----------
    imge : ndarray
        Input array that stores the image pixel values.

    Returns
    -------
    negImge : ndarray
        The negative pixel values of the original image.
    """

    # Compute the absolute of the resulting values
    negImge = np.abs(imge - 255)

    # Return the final result
    return negImge
Testing the Code
First let’s read an image file and store it in an array as shown below.
#Read an image file
imge = Image.open("Images/cameraman.tif") # open an image

#Convert the image file to a matrix
imge = np.array(imge)

#Convert the uint datatype of the matrix values into 'int' for using the negative values
imge = imge.astype('int')

##Note: If the image is RGB colored, we can convert to grayscale image as follows
#imge = imge.convert(mode='L')
To check the dimension(size) of the image:
print "Image Size: ", imge.shape
Image Size: (512, 512)
So the image is 512x512 in size.
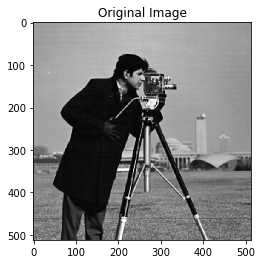
Now let’s display the original image before it is converted.
#plt.figure(figsize=(5,5))
plt.imshow(imge, cmap=plt.get_cmap('gray'))
plt.title('Original Image')
plt.show()
The negative of the image can be computed by using the above implemented function. We can also display it using the same technique as above.
#Compute the negative of the given image.
negImge = computeNegativeImage(imge)

#Display the resulting image
plt.imshow(negImge, cmap=plt.get_cmap('gray'))
plt.title('Negative of the Image')
plt.show()
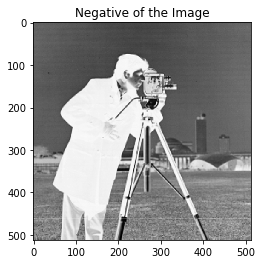
From the above result, we can see that all the colors are interchanged. We can check the black and white colors in the original and the resulting images to see the effects of the operation.
Conclusion
In this post, we have seen how to upload and display an image. The image is then inverted where every pixel intensity is changed to its negative value (white -> black and black -> white).